What is the New Virtual Appointments Feature in Microsoft Teams?
Published Tuesday, April 11, 2023.
Do you have to schedule huge amounts of appointments and need to pay for expensive tools to get it done? Well we at Lumity have a solution, thanks to Microsoft!
These are only a few instances of groups that will benefit from Microsoft Teams’ new feature - Virtual Appointments - a recently introduced meeting style specially designed for customer engagements. If you have been employing Teams alongside other online appointment applications, this innovative feature will enhance and simplify your experience.
What is the new Virtual Appointments Feature in Teams?
With Virtual Appointments, you have access to a comprehensive meeting platform for customer engagements. In Microsoft Teams, you can schedule, oversee, and conduct B2C meetings all in one place.
This innovative feature combines the scheduling component with the video conference interface, streamlining the process for all involved. Furthermore, anyone can join the virtual appointment through a link, even if they do not have a Teams account.
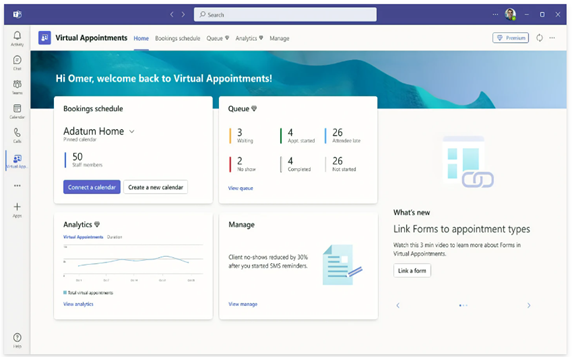
All this is possible through Microsoft’s scheduling app, Bookings, which connects to Teams: Making Virtual Appointsments seamless.
What Kind of Features Are Available?
A wide array of features are available with Virtual Appointments for Microsoft Teams. We’ll discuss them below, though, please note that whilst most are available with most base Microsoft 365 plans, some require a premium plan as specified.
Send Customized Notifications (Confirmations, Reminders, etc)
Sending customers a personalized message through SMS or email is an excellent way to personalize their experience. Moreover, using automation can provide that personalized touch without the need to send each message manually. With automated appointment reminders, you can save time and ensure that your customers do not miss any scheduled appointments.
Have Your Clients Wait In Your Custom Waiting Room
Personalize your virtual engagements by customizing the Teams waiting room with a personal touch. With the option to use themes and logos, you can easily brand your business and make a lasting impression on your attendees. Additionally, the chat feature in the waiting room allows you to communicate with attendees while they wait, which is particularly helpful if your current appointment is running over time. You can keep them informed about the delay and reassure them that you will be with them shortly.
Send Customized Meeting Follow-ups
You can send meeting follow-ups after a virtual appointment. This helps you reduce the time it takes to send any promised follow-up information. You also keep all details in a single place. This makes your client communication trail easier to follow.
Track Appointment Analytics Across Organizations & Departments
It can be challenging to gauge the effectiveness of your appointments, especially if you lack a reliable tracking system. Without proper visibility into customer appointments across the organization, it’s difficult to know if your demos are translating into sales. However, you can leverage a premium analytics feature to address this issue. This feature offers helpful reporting, providing insights into B2C virtual appointments across all departments. With this information, you can gain a better understanding of the effectiveness of your appointments and make informed decisions to optimize your sales strategy.
How Do You Use Virtual Appointments?
To begin using Virtual Appointments in Teams, admins need to set up a few things. It’s important to note that the user must be a Bookings admin to access these settings.
Want Help Configuring Your Environment for Virtual Appointments?
Let's chat!

Create your Calendar/s
To create a calendar in the Virtual Appointments app, select “Create a calendar” located on the Home tab. For larger organizations, it may be beneficial to create separate calendars for different departments.
Add Your Staff
After creating a calendar, the next step is to add staff members, up to a maximum of 100, and assign them a role. Once the staff members have been added, their availability can be viewed in both Teams and Outlook. One of the great benefits of using an integrated platform like M365 is the cross-app compatibility. This means that your calendar will sync across apps, making it easier to manage and keep track of appointments.
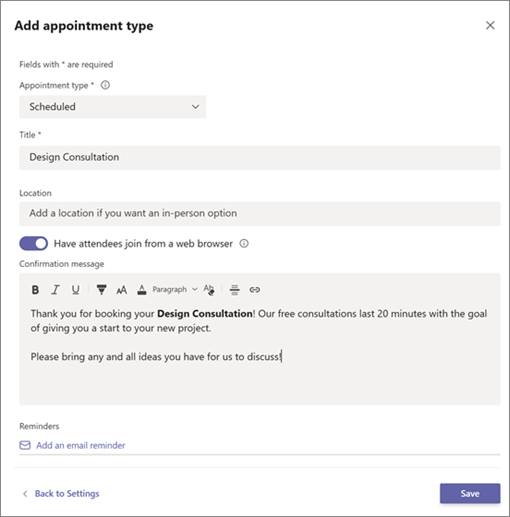
Create All Your Appointment Types
The next step is to set up your appointment types, which can be done by choosing from two options:
-
Scheduled: This option allows you to schedule a specific day and time for the appointment. The system will then add this information to the email confirmation.
-
On-demand (Teams Premium): This option enables customers to choose the most convenient time from your booking calendar. However, it requires Teams Premium.
Configure SMS Notifications (Optional)
If you choose to use SMS notifications and have the appropriate Teams plan, you can set it up next. This feature makes it easy to send appointment confirmations and reminders via text message. However, it’s important to note that attendees must currently have a valid U.S., Canadian, or U.K. phone number to receive the SMS notifications (Likely to include other countries soon!).
Include Any Forms Required
If you would like your attendees to fill out any forms, you can link them now. With Virtual Appointments, you can link up to four cloud-based forms, which can be forms you have created using Microsoft Forms.
Finally, Publish your Booking Page!
If you want to enable customers to book on-demand appointments, the next step is to publish the booking page. This can be done on the “Manage” tab of Virtual Appointments by selecting “Booking page” and turning on the “Publish booking page” option.
Want An Expert To Get You Sorted?
Microsoft 365 is a versatile platform with many possibilities. However, many companies may not be utilizing all of its features, which can result in less effective teams and wasted expenses on unnecessary apps.
If you’re interested in maximizing your Microsoft 365 experience, our team here at Lumity is ready to assist you and take away the stress. Feel free to contact us today, or schedule a discussion.