A Simple, Low-Code Method For Moving SharePoint Document Libraries
Jett Jackson - Director of Software Development
Published Wednesday, May 18, 2022.
Moving large document libraries in SharePoint can be a little scary. Ensuring you preserve metadata is even scarier!
Recently I was tasked with moving a large document library for a client of ours between hub sites; with the added business requirement of preserving all metadata stored in the library’s site columns. You might think a process such as this, using a platform designed to easily manage document stores, would be fairly simple. You would be wrong. The water is further muddied with Microsoft being in limbo between migrating all of its SharePoint Online (SPO) functionality and styling from its dated ‘Classic Experience’, to it’s ‘Modern’ one. Settings and and functions are strewn between the two, making it difficult to navigate the platform when your business requirements become a little more complex. You can try using the built in ‘Copy to’ and ‘Move to’ functions, and whilst they certainly will move the documents across, you’ll likely find your custom metadata is not preseved!
If you need to move a list or library and preserve site column metadata to another hub/site, you need to ensure that the columns used to record this data exist on the destination list/library. This is fairly easy to achieve for lists/libraries that only have a few custom columns, by manually creating them. However, issues arise when you have a significant number of these custom columns, given that their naming and types need to reflect exactly, those of the custom columns on the source list/library.
So how can we streamline this process? And most importantly, how can we do it safely? Well, there’s no surefire, easy to use, documented way to peform this task that I was able to find, as of the writing of this blog post. And, the complete Powershell options that are shared online often utilize deprecated functions or seem a little dicey. Luckily however, I was able to patch together a series of easy to follow steps that will help you get the job done, with a little bit of PowerShell required, and only a few caveats.
Before you begin; Considerations & Caveats
Note that there are a few things to note when performing a migration using this method. they are as follows:
- You will require complete administrative rights on your tenant.
- The source and destination lists/libraries must exist on the same tenant. Though, they can exist on different hubs/sites, or exist on the same hub/site if you wish.
- I recommend keeping a copy of the source list/library and performing a quick audit to ensure the migration has been performed successfully. Its also reasonable to maintain this for auditing. More info on this in Steps 12 and 14.
- This method will also migrate list/library views aswell! Useful!
In addition, the following site columns and properties will NOT be preserved on the destination:
- Document Version History (Hence why it may be important for you to retain the source version as an archive) - NOTE: There is a way to retain Version History (see Step 12). It ultimately depends on your business requirements, however - so consider this before hand; you can find additional reasoning in section ‘What To Do If The Process Fails’ below.
- Modified Column (Will be set to the amount of time since the migration occurred)
- Modified By Column (Will be set to the user account used to perform the migration)
- Date Modified Column (Will be set to the date the migration occurred)
- ID Column (Will be automatically assigned during migration as the new list/library is populated)
With these in mind, lets begin our migration!
The Process
I’m going to utilize a Document Library to display how to go about this, but the process should be fairly similar for a List. More info on what you might need to do for a list in the ‘Wrapping up’ section at the end of this post.
Step 1
You will need to ‘Allow Custom Scripts’ on the tenant within which you are performing the migration. Again, this solution doesnt consider cross tenant moves.
Normally, to allow Custom Scripts, you would do enable the option within the SharePoint Admin portal. However, at the time of writing, Microsoft is in the process of disabling the ‘Classic settings page’, where this setting normally resides within the Admin Portal. I was unable to access this setting when I tried due to this deprecation, so instead I had to use a Powershell approach, below:
|
|
If you’re not sure how to utilize the SharePoint PnP Powershell cmdlet, or Powershell in general - there are many resources online. This Youtube video should help get you started though.
Step 2
With custom scripts now enabled, navigate to your source Document Library. Then, select the settings cog at the top right of the window, then select ‘Library Settings’.
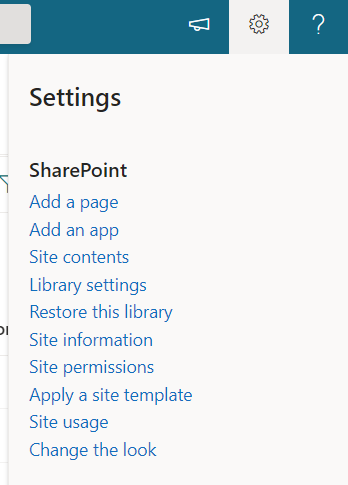
Step 3
Here, select ‘Save document library as template’.

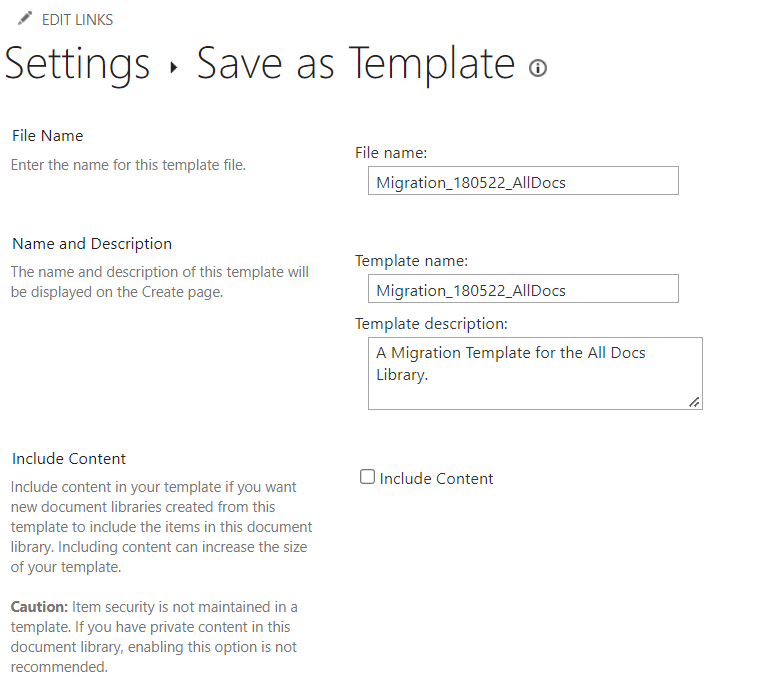
Step 4
In the next screen, Fill out the form, inputting a name for the Template File, and Template - something like ‘Migration_{TodaysDate}_LibraryName’ etc for both. Give the Template a bit of a description and then decide if you want to ‘Include Content’. In most cases, especially for Document Libraries, you shouldn’t select this option. Why? Because it’s limited to ~50MB 1 of data per template. For most document libraries - this will be no where near enough. We’ll manually migrate our data later, but if you’re dealing with a list, this may be enough; so feel free to tick this and ignore the part where we migrate our data if it will suit your purposes. Then, select ‘OK’.
Step 5
This will create a new template in your ’list template gallery’. To access the gallery, the window that shows after creating the template should provide a link - click that link. Otherwise, if you miss that prompt, you can add ‘/_catalogs/lt/Forms/AllItems.aspx’ to your site address to access the gallery. I.e. ‘https://{tenant}.sharepoint.com/sites/{site_name}/_catalogs/lt/Forms/AllItems.aspx’. Otherwise, if you prefer, there should be a listing for the ’list template gallery’ in your site settings.
Step 6
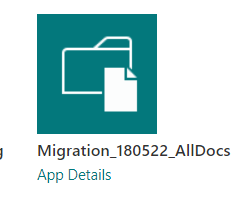
In this window, simply select the name of the template you created and this will download a template file that we’ll use later.
Step 7
Next, navigate to the hub/site where your library is destined to be created. Then, navigate to the ’list template gallery’ as discussed in step 5. Select ‘Files’ towards the top left of the screen and then select ‘Upload Document’ - then point the file browser to the template file you downloaded in step 6.
Step 8
With your template now uploaded to the destination hub/site, we now need to add the new Library! Whilst on your destination hub/site, click the cog at the top right, and then select ‘Add an app’. Here on this next page you should see an option to view the ‘classic experience’, select that. Or if it’s missing add the following to your site page url ‘/_layouts/15/addanapp.aspx’, similarly as we did in step 5.
Step 9
Here, you should see an icon with the name of the template you created in steps 4/5. Select that, and in the pop up window, select ‘Advanced Options’. In the fields shown, give the new library a Name and Description. NOTE: use a readable name here, as it will be used in Listings on your site; i.e. ‘Controlled Documents’ etc. Dont use the name you used in step 4. It’s also good practice to include a reasonable description of what the library is used for. Hence us using the advanced options view. Once you’re done, select ‘Create’.
Step 10
Now you should find the new library has been created. If you’re not immediately navigated to the new list, or can’t find it, you should see it within you ‘Site contents’ which is available by selecting the settings cog, top right - then selecting the record matching the library title you used in the items listed.
Navigating to the library, you should see all the columns have been created for you! With the correct name and types applied, along with descriptions per column, etc.
Step 11
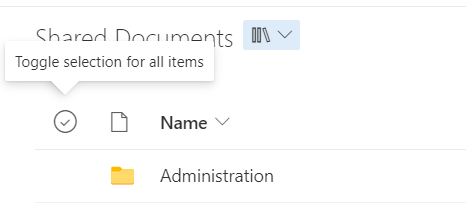
Next, let’s migrate the folders and documents from the source library to the destination library. Firstly navigate back to your source library. Then select the documents you wish to move by using the toggle radio buttons to the left of the entries. You can mass select things by using the toggle at the very top left, amongst the library columns, shown below.
Step 12
Once you’ve selected the folders and documents you wish to migrate, select ‘Copy to’ or ‘Move to’ towards the top of the screen, shown below.
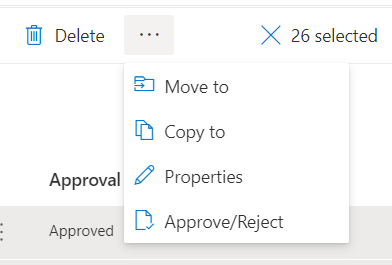
NOTE: ‘Copy to’ will preserve the files in the source library (I recommend using this and archiving it later). ‘Move to’ will essentially cut and paste the files, removing the files in the source library. HOWEVER, version history will be preserved in the destination library by using ‘Move to’. If you need the version history, you can utilize this function instead, but note, you wont have anything to archive in the old source library.
Step 13
In the window that appears, select the destination Hub/Site the new library exists within - on the left, then select the library within the center of the window. then select ‘Copy/Move here’.
Step 14
This will begin copying/moving the files/folders to the destination library.
IMPORTANT: You need to leave this window open to enable to perform the migration. You should be able to see the progression of the migration whilst it happens. Once it completes, you can close the window.
NOTE: You may find that SharePoint doesnt give you feedback about whether the move/copy has finished; it may appear as if it is ‘hung up’. This is likely to happen for large document libraries. If so, give it a significant amount of time to progress. Then, check the destination list - if all your files have been added, you can likely close the migration window. To be super certain, you may wish to leave it open for awhile longer just to be double sure.
What To Do If The Process Fails
If anything happens during the migration, If you’ve used the ‘Copy to’ function you can always delete the files in the destination list and try again. Or, if you used ‘Move to’, simply move any remaining files/folders in the source library that remain. The rest should be within the destination library. Though, this is why I recommend using the ‘Copy to’ function over the ‘Move to’ function, so you can audit the result for success.
Finally, you should also be able to roll the library back using the ‘Restore this library’ 2 option, located under the setting cog when viewing the source library - if anything truly catastrophic happens.
Wrapping up
Hopefully this helped you in some way. Though, it may be that between the writing of this blog post and the day you’re reading it, there have been some changes to the process as Microsoft continues to move to a completely ‘Modern’ SharePoint experience.
If you need to migrate a list instead of a library, alot of the same principles will apply. However, physically migrating the records within the lists will likely require a Power Automate workflow, or a excel dump and re-upload on the destination. You should be able to find information on how to achieve that with a bit of a google.
If you’re after SharePoint consulting and services, you can call us now on 1300 LUMITY, or click the button below to fill out our form!
Need help from the SharePoint Experts?
Let's chat!